Appearance
Integrating with a Microsoft Teams chat (on-prem)
Learn how to configure CalypsoAI as a chatbot in your Microsoft Teams environment using our on-premises deployment option. This tutorial walks you through the complete process of creating, configuring, and deploying your CalypsoAI Microsoft Teams bot.
PREREQUISITES
You must have an active CalypsoAI Inference Defend subscription, and be an administrator user of your organization's Microsoft Teams.
Add the bot in Microsoft Developer Portal
Register your bot in the Microsoft ecosystem to create the necessary infrastructure for the Microsoft Teams integration.
In your browser, go to https://dev.teams.microsoft.com/home.
From the menu, select Tools.
On the Tools page, select Bot management.
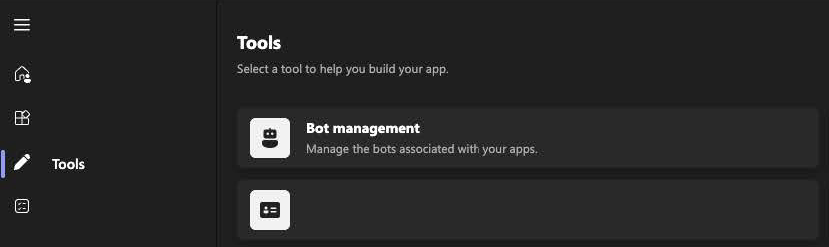
On the Bot management page, select New bot.
In the Add bot popup, in Bot name, enter
CalypsoAI, and then select Add.The newly-created CalypsoAI bot is now displayed in the list on the Bot management page.
Select the CalypsoAI bot.
In the Configure section, select the Bot Framework Portal link.
A Bot profile page opens on a new tab, and might require additional authentication.
On the Bot profile page, in the Configuration section, in Messaging endpoint, enter
${CAI_MODERATOR_BASE_URL}/backend/v1/bots/teams/messages.Replace the
${CAI_MODERATOR_BASE_URL}string with the actual base URL of your back end.Select Save changes.
Configure bot permissions
Configure the required security permissions in Microsoft Entra. Without these permissions the bot cannot function properly in your organization's Teams environment.
In your browser, go to https://entra.microsoft.com/.
From the menu, select Identity > Applications > App registrations.
On the All applications tab, select the CalypsoAI app.
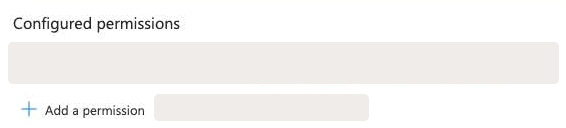
On the CalypsoAI app registration page, in the Manage category, select API permissions.
In the Configured permissions section, select Add a permission.
On the Request API permissions pane, on the Microsoft APIs tab, select Microsoft Graph.
When asked to choose the type of permission for your app, select Application permissions.
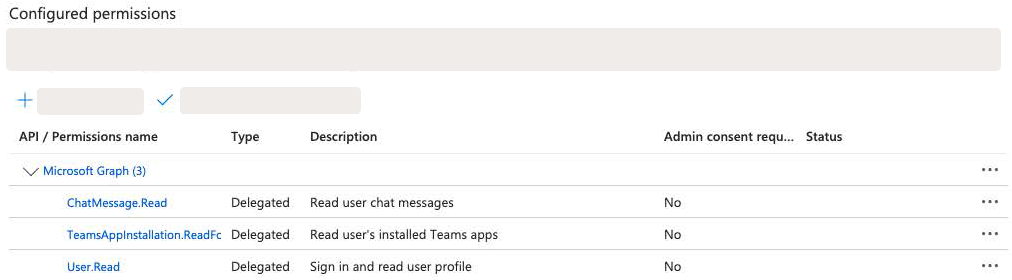
Under Select permissions, find and enable the appropriate permissions in the following resources:
- In the
ChatMessageresource, enableChatMessage.Read.All. - In the
TeamsAppInstallationresource, enableTeamsAppInstallation.ReadForUser.All. - In the
Userresource, enableUser.Read.All.
- In the
Select Add permissions.
Confirm that your CalypsoAI page lists the required permissions as configured.
In the Manage category, select Certificates & secrets.
On the Client secrets tab, select New client secret.
On the Add a client secret pane, add a description and expiration date for your secret, and then select Add.
The new secret value and ID should now be listed for the CalypsoAI app registration.
Copy the Value for the new secret.
STORING THE SECRET
Make sure you store the secret value securely — you will not see this value again.
On the machine you are using to deploy the server, set the following environment variables:
CAI_MODERATOR_MS_TEAMS_APP_ID="": Use the Application (client) ID value from the Overview section on the CalypsoAI app registration page.CAI_MODERATOR_MS_TEAMS_APP_PASSWORD="": Use the secret value you configured in the previous steps.CAI_MODERATOR_MS_TEAMS_BOT_ID="": Use the Application (client) ID value from the Overview section on the CalypsoAI app registration page.CAI_MODERATOR_MS_TEAMS_TENANT_ID="": Use the Directory (tenant) ID value from the Overview section on the CalypsoAI app registration page.
Restart the deployment server.
With that configuration in place and the CalypsoAI backend server restarted, you can proceed with installing the CalypsoAI bot in the Microsoft Teams client.
ENTRA PERMISSIONS
For more information on configuring Microsoft Entra permissions, see the Microsoft Entra documentation.
Create a bot project
A bot project is a fundamental component for your Microsoft Teams integration. For the purpose of this tutorial, we will use the project to configure some basic settings and generate the necessary credentials.
To create a bot project:
Log in to CalypsoAI.
From the menu, select Projects.
In the Quick project setup section, select the Bot (Slack or Microsoft Teams) option, and then select Create.
In the popup, complete the basic configuration for your bot:
- In Bot name, enter the name for your bot.
- From the available models list, choose the AI model you want to use for your bot.
- From the Assign project admins list, select one or more administrator users to manage your bot configuration.
Select Create.
CalypsoAI displays confirmation that the bot with the default scanners enabled was created and is connected to the chosen AI model.
In the next popup, select Generate API key.
CalypsoAI generates and assigns an API token for your bot project.
STORING THE TOKEN
Make sure you store the token securely, as it is required to complete the configuration in Microsoft Teams.
Select Next.
In the next popup, select the Microsoft Teams option, and then select Next.
In the Download window, download the
.zipapp manifest file by selecting the Download here link.APP MANIFEST FILE
You will use this
.zipfile later to install the CalypsoAI bot in a Microsoft Teams client.Select Next, and then Finish.
Your CalypsoAI bot project is now ready to be integrated with Microsoft Teams.
Upload the CalypsoAI bot app to Microsoft Teams
After creating the bot project, you need to add the CalypsoAI app to your organization's Microsoft Teams environment, making it available for users to install and access.
DIFFERENT STEPS?
The steps in the following procedure can differ depending on how your organization manages Microsoft Teams.
To upload the CalypsoAI app:
Open the Microsoft Teams desktop app.
From the main menu, select Apps > Manage your apps > Upload an app.
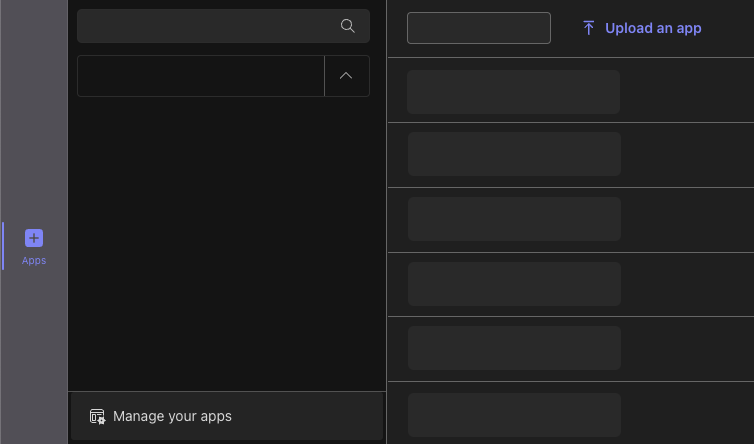
In the Upload an app window, select Upload an app to your organisation's app catalogue.
In the popup, upload the
.zipmanifest file you downloaded from CalypsoAI.The CalypsoAI app card is now available in the list of apps for your organization.
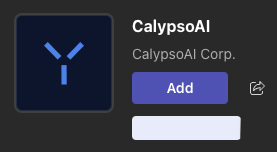
Select the CalypsoAI card, and then select Add.
Your CalypsoAI app is uploaded and added to Microsoft Teams, and should be visible in the main Microsoft Teams menu.
Configure the CalypsoAI bot app in Microsoft Teams
Establish the connection between your Teams environment and the CalypsoAI bot, enabling secure communication and functionality.
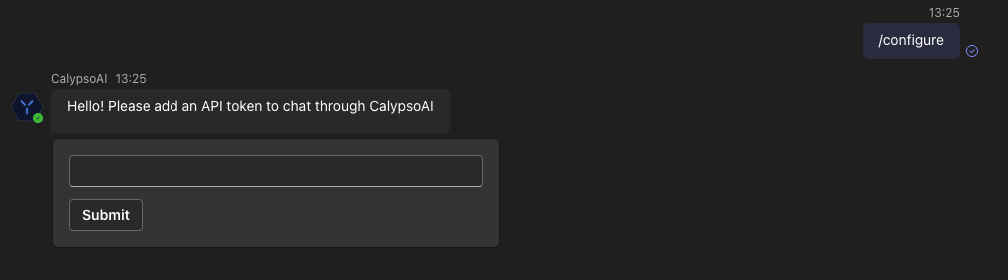
- From the Microsoft Teams main menu, select CalypsoAI.

- In the message text box, enter and send the
/configurecommand. - In the response box from CalypsoAI, enter the API token you created for the CalypsoAI bot project, and then select Submit.
After the token is accepted, you can start interacting with the CalypsoAI bot through the message text box:
To list the AI models available in the chat, enter and send
/models.To start a new chat with the default model, enter and send
/chat <YOUR-MESSAGE>For example:
/chat What is the capital of Peru?To start a new chat with a specific model, enter and send
/chat-with <MODEL-NAME>For example:
/chat-with gpt-4
Finalize the integration
Complete the integration process by finalizing the bot project configuration in CalypsoAI.
- Log in to CalypsoAI.
- From the menu, select Projects.
- Find the bot project you created in Create a bot project.
- In the project's card, select View details.
- Select Finish integration.
- In the popup, select the Microsoft Teams option, and then select Next.
- In the Download window, select Next, and then Finish.
Your Microsoft Teams integration is now complete!